[Check Latest Arrivals spray for glass frosting on Amazon.]
# Glass Frosting Spray: The Ultimate Guide to DIY Frosted Glass in 2026
Want to add a touch of privacy or a decorative element to your glass surfaces? Glass frosting spray is a surprisingly easy and effective way to achieve professional-looking frosted glass at home. Forget messy etching creams or expensive pre-frosted glass – with the right spray and a few simple steps, you can transform ordinary windows, mirrors, and even glass doors into stunning frosted masterpieces.
In this ultimate guide for 2026, we’ll cover everything you need to know about using spray for glass frosting, from choosing the right product to mastering the application process. Let’s dive in and unlock the potential of this fantastic DIY solution.
[Explore Top Rated spray for glass frosting on Amazon.]
## Why Use Spray for Glass Frosting?
Before we jump into the how-to, let’s talk about why you might choose a spray for glass frosting over other methods.
* **Ease of Use:** Spraying is arguably the simplest way to frost glass. No messy stencils or complicated techniques are required.
* **Cost-Effective:** Compared to purchasing pre-frosted glass or hiring a professional, glass frosting spray is an incredibly budget-friendly option.
* **Versatility:** You can frost entire surfaces, create patterns using stencils, or even add a decorative touch to specific areas of your glass.
* **Privacy:** Frosted glass offers varying degrees of privacy, depending on the product and number of coats applied. It’s perfect for bathrooms, entryways, and offices.
* **Aesthetic Appeal:** Frosted glass adds a touch of elegance and sophistication to any space. It diffuses light beautifully, creating a soft, inviting ambiance.
[Explore Top Rated spray for glass frosting on Amazon.]
## Step-by-Step Guide to Perfect Frosted Glass with Spray
Ready to get started? Follow these steps for flawless frosted glass results:
### Step 1: Gather Your Supplies
Before you even think about picking up the spray can, you’ll need to gather your tools. This ensures a smoother application process and helps prevent mistakes. Here’s what you’ll need:
* **Spray for Glass Frosting:** Choose a high-quality product formulated for glass. More on this in later sections.
* **Cleaning Supplies:** Glass cleaner (like Windex), microfiber cloths, and rubbing alcohol.
* **Painter’s Tape:** To mask off areas you don’t want to frost. High quality painter’s tape will give crisp lines.
* **Drop Cloth or Newspaper:** To protect your work surface from overspray.
* **Razor Blade or Scraper:** For removing any excess spray or imperfections.
* **Stencils (Optional):** If you want to create designs.
* **Safety Mask:** To avoid inhaling fumes.
* **Gloves:** To protect your hands.
* ** хорошо Ventilated Area:** It’s important to work in a space with good air circulation.
### Step 2: Prepare the Glass Surface
Proper preparation is key to achieving a professional-looking finish. Start by thoroughly cleaning the glass surface with glass cleaner and a microfiber cloth. Remove any dirt, grime, or fingerprints. For stubborn residues, use rubbing alcohol.
Once clean, dry the surface completely with a clean, lint-free cloth. Any residue or moisture can interfere with the adhesion of the spray and result in an uneven finish.
### Step 3: Mask Off Areas (If Necessary)
If you only want to frost certain areas or create patterns, use painter’s tape to mask off the sections you don’t want sprayed. Ensure the tape is firmly adhered to the glass to prevent the spray from bleeding underneath.
For intricate designs, consider using stencils. You can find pre-cut stencils at craft stores or create your own using a stencil cutter.
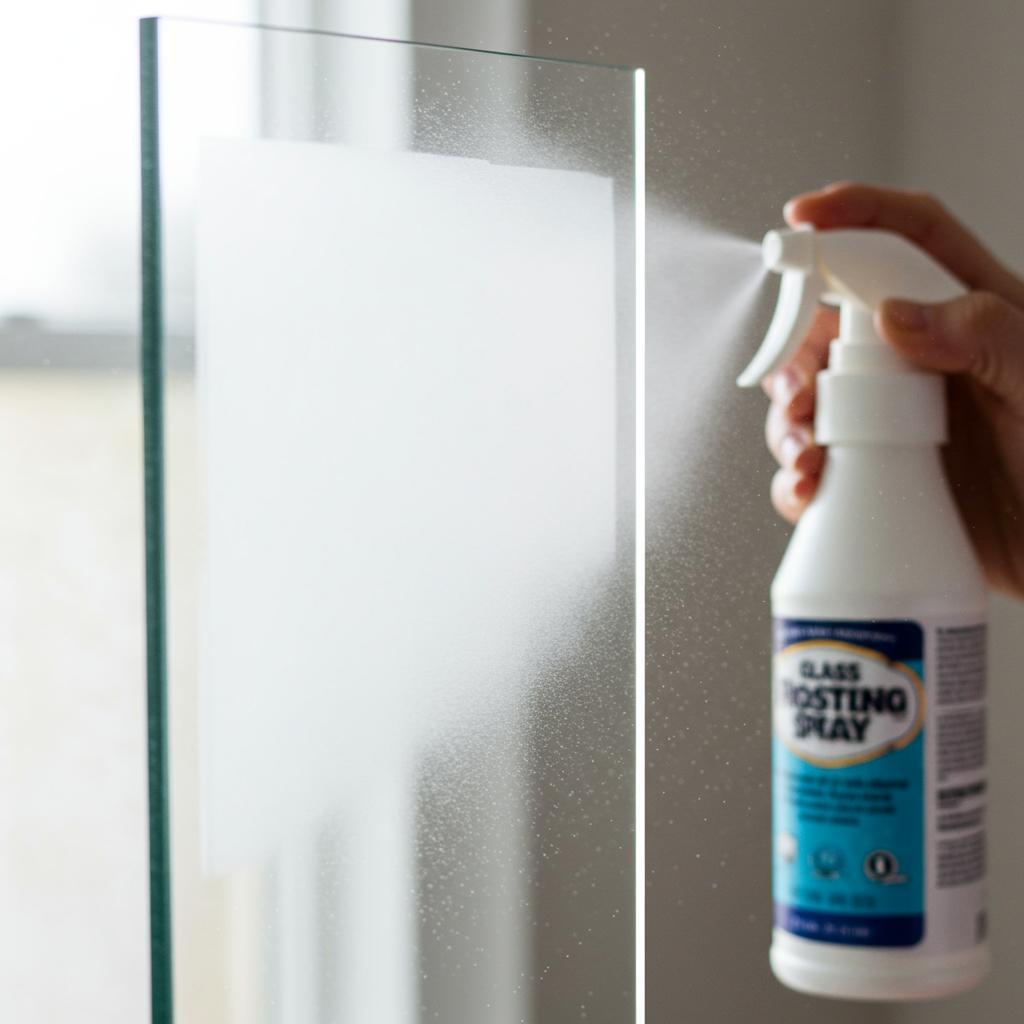
### Step 4: Apply the First Coat of Spray
Now it’s time to apply the first coat of spray. Hold the can about 10-12 inches away from the glass surface and apply a thin, even coat using smooth, overlapping strokes. Avoid spraying too much in one area, as this can lead to drips and an uneven finish.
Remember to shake the can well before each use to ensure the ingredients are properly mixed.
### Step 5: Allow the First Coat to Dry
Let the first coat dry completely before applying the next one. The drying time will vary depending on the product and environmental conditions, but it typically takes about 15-30 minutes. Check the product label for specific instructions.
Be patient! Rushing the drying process can result in a cloudy or uneven finish.
### Step 6: Apply Subsequent Coats (If Desired)
Depending on the level of opacity you want to achieve, you may need to apply additional coats of spray. Follow the same technique as with the first coat, allowing each coat to dry completely before applying the next.
Generally, 2-3 coats will provide a good level of privacy and a nice, even frosted finish.
### Step 7: Remove the Masking Tape or Stencils
Once the final coat is completely dry, carefully remove the masking tape or stencils. Pull the tape away from the frosted area at a 45-degree angle to avoid chipping or peeling the frosted finish.
If any spray has bled underneath the tape, you can carefully remove it with a razor blade or scraper.
### Step 8: Clean Up and Admire Your Work
After removing the masking tape, clean up any overspray or drips with a damp cloth. Once everything is clean and dry, step back and admire your beautiful, newly frosted glass!
[Explore Top Rated spray for glass frosting on Amazon.]
## Tools for the Job: Recommended Spray for Glass Frosting Products
Choosing the right spray for glass frosting is crucial for achieving professional-looking results. Here are a couple of recommended products and why they stand out:
* **Krylon Sea Glass Spray Paint:** This spray produces a subtle, elegant frosted finish that resembles sea glass. It’s ideal for adding a touch of privacy and sophistication to windows, mirrors, and decorative items. It’s *key feature* is easy application preventing drips, due to its spray nozzle. Makes it *best for* beginners looking for a user-friendly spray option.
* **Rust-Oleum Frosted Glass Finish:** This spray provides a more opaque and textured frosted finish, making it perfect for applications where privacy is the primary concern. Its *key feature* is its exceptional adhesion and durability, ensuring a long-lasting finish that resists scratches and fading. *Best for* high-traffic areas or applications where durability is essential.
[Explore Top Rated spray for glass frosting on Amazon.]
## Pro-Tips and FAQs for Spraying Glass
Here are some pro-tips to help you master the art of glass frosting spray:
* **Test First:** Always test the spray on a scrap piece of glass before applying it to your project. This will allow you to get a feel for the spray pattern and drying time.
* **Light Coats are Key:** Apply thin, even coats of spray to avoid drips and an uneven finish.
* **Work in a Well-Ventilated Area:** Glass frosting spray can release fumes, so it’s important to work in a well-ventilated area.
* **Clean the Nozzle:** After each use, turn the can upside down and spray until clear to prevent the nozzle from clogging.
* **Consider the Lighting:** The appearance of frosted glass can vary depending on the lighting conditions. Experiment with different lighting to achieve the desired effect.
**FAQs:**
* **Can I use glass frosting spray on car windows?** While some people do, it’s generally not recommended. The spray can affect visibility and may not be legal in all areas.
* **How do I remove glass frosting spray?** You can remove glass frosting spray with a razor blade scraper and a solvent like paint thinner or acetone. Be careful not to scratch the glass.
* **Is glass frosting spray permanent?** While durable, glass frosting spray is not entirely permanent. It can be scratched or peeled off with enough force.
[Explore Top Rated spray for glass frosting on Amazon.]
## Conclusion: Your DIY Frosted Glass Awaits!
So, is creating DIY frosted glass with spray worth it in 2026? Absolutely! With the right products, preparation, and technique, you can easily transform ordinary glass surfaces into beautiful and functional frosted masterpieces. Whether you’re looking to add privacy to your bathroom window or create a decorative pattern on a glass vase, glass frosting spray is a versatile and cost-effective solution.
Now that you have the knowledge and tools, get out there and start experimenting! You’ll be amazed at what you can achieve with a little spray for glass frosting and some creativity. Remember to always prioritize safety and follow the manufacturer’s instructions for the best results. Happy frosting!
[Shop Budget-Friendly spray for glass frosting on Amazon.]


![Beeswax Furniture Polish: Revive Your Wood with These Top Picks [2026]](https://www.besthomecleaningreviews.com/wp-content/uploads/2025/10/2247-beeswax-furniture-polish-revive-your-wood-with-these-top-picks-2026-150x150.png)