[Check Latest Arrivals kitchen cupboard spray paint on Amazon.]
# Kitchen Cupboard Spray Paint: The Ultimate DIY Guide to a Flawless Finish
Are you tired of your outdated kitchen cupboards but dread the thought of a full-blown renovation? You’re in the right place! Giving your kitchen a fresh, modern look doesn’t have to break the bank. With a little elbow grease and the right kitchen cupboard spray paint, you can achieve a gorgeous, professional-looking finish without spending a fortune. This guide empowers you with everything you need to know to transform your kitchen using spray paint for kitchen cupboards successfully. Let’s dive in!
[Explore Top Rated kitchen cupboard spray paint on Amazon.]
## Step 1: Preparation is Key to Spray Painting Kitchen Cupboards
The secret to a flawless finish with your kitchen cupboard spray paint isn’t just the paint itself – it starts with meticulous preparation. Skimping on this step can lead to disastrous results, so let’s get it right from the start.
### Remove Hardware and Doors
First, remove all hardware (handles, knobs, hinges) from your cupboards. Label them clearly (e.g., “Upper Left Door – Hinges”) so you can easily reassemble everything later. Then carefully remove the doors and drawers from their frames.
### Clean, Clean, Clean
This step is non-negotiable! Grease, grime, and residue can prevent the kitchen cupboard spray paint from adhering properly, resulting in peeling and chipping.
* **Degrease:** Use a strong degreaser like Krud Kutter or TSP (trisodium phosphate) to thoroughly clean all surfaces. Follow the product instructions carefully, paying special attention to safety precautions (gloves and eye protection are crucial).
* **Rinse:** Rinse thoroughly with clean water to remove all traces of the degreaser.
* **Dry:** Allow the surfaces to dry completely.
### Sanding for Success
Sanding provides “tooth” for the kitchen cupboard spray paint to grip onto.
* **Light Sanding:** Use 220-grit sandpaper to lightly sand all surfaces, paying attention to edges and corners. The goal is to scuff the existing finish, not to remove it entirely.
* **Tack Cloth:** After sanding, wipe down all surfaces with a tack cloth to remove any sanding dust. This is essential for a smooth finish.
### Priming for Perfection
Priming is crucial, particularly if your cupboards are made of a dark wood or have a glossy finish. A good primer provides a consistent base for the kitchen cupboard spray paint and helps it adhere better.
* **Choose the Right Primer:** Use a bonding primer specifically designed for kitchen cabinets. Shellac-based primers are excellent for blocking stains and preventing bleed-through from dark woods like cherry or mahogany. Oil-based primers are also good, but require mineral spirits for cleanup. Water-based primers are lower in VOCs (volatile organic compounds) and easy to clean up but may not offer the same stain-blocking power.
* **Apply Thin, Even Coats:** Apply the primer in thin, even coats using a high-quality brush, roller, or spray gun. Follow the manufacturer’s instructions for drying time between coats. A spray gun will give you the smoothest possible finish, but it requires practice and proper ventilation. Two thin coats of primer are generally better than one thick coat.
* **Lightly Sand Again:** After the primer is completely dry, lightly sand it with 320-grit sandpaper to smooth out any imperfections. Wipe down with a tack cloth again before painting.
[Explore Top Rated kitchen cupboard spray paint on Amazon.]
## Step 2: Spray Painting Your Kitchen Cabinets
Now for the fun part! Applying your kitchen cupboard spray paint.
### Choose Your Spray Paint Wisely
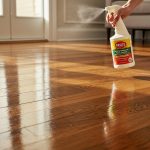
The type of spray paint matters. Opt for a paint specifically formulated for cabinets and furniture. Look for terms like “cabinet paint,” “furniture paint,” or “enamel paint.” These paints are designed to be durable, washable, and resistant to chipping and scratching. We recommend the **Rust-Oleum Cabinet Transformations Kit** ([Amazon Affiliate Link Here]). This kit offers everything you need for your kitchen cabinet transformation. It’s durable, easy to use, and gives a professional-looking finish. Plus, it comes in a variety of colors to match your kitchen decor. *Key Features: Durable finish, easy application, and comprehensive kit.* This choice simplifies the entire process, giving you a professional outcome.
### Proper Ventilation is Critical
Spray painting releases fumes that can be harmful to your health. Work in a well-ventilated area, such as a garage with the door open, or outdoors on a day with little to no wind. Wear a respirator mask to protect yourself from inhaling the paint fumes.
### Protect Your Work Area
Cover your work surface with a drop cloth or plastic sheeting to protect it from overspray. Use painter’s tape to mask off any areas you don’t want to paint, such as the inside edges of the cabinet frames.
### Test Your Spray Technique
Before you start painting your cabinets, practice your spraying technique on a piece of scrap cardboard. Hold the spray can about 8-10 inches away from the surface and move it in smooth, even strokes. Avoid holding the can too close, as this can result in drips and runs.
### Apply Thin, Even Coats of Kitchen Cupboard Spray Paint
Just like with primer, multiple thin coats are better than one thick coat. Apply the spray paint in thin, even coats, overlapping each stroke slightly. Allow the paint to dry completely between coats, following the manufacturer’s instructions. Two to three coats are usually sufficient for full coverage.
### Let the Paint Cure
Once you’ve applied the final coat of paint, let it cure completely before reassembling your cabinets. This can take anywhere from 24 to 72 hours, depending on the type of paint you’re using. Curing allows the paint to harden and become more durable.
[Explore Top Rated kitchen cupboard spray paint on Amazon.]
## Step 3: Reassembly and Final Touches
Congratulations, you’ve successfully spray-painted your kitchen cabinets! Now it’s time to put everything back together and enjoy your newly transformed kitchen.
### Reattach Hardware
Carefully reattach the hardware to the doors and drawers, using the labels you made earlier to ensure everything goes back in the correct place. If you’re feeling ambitious, you could even upgrade your hardware for an even more dramatic transformation.
### Rehang Doors and Drawers
Rehang the doors and drawers onto their frames. Adjust the hinges as needed to ensure they are aligned properly and swing smoothly.
### Clean Up and Admire Your Work
Clean up your work area and dispose of any used materials properly. Then, step back and admire your handiwork! You’ve successfully transformed your kitchen with a fresh coat of kitchen cupboard spray paint.
[Explore Top Rated kitchen cupboard spray paint on Amazon.]
## Tools for the Job: Making the Process Easier
While kitchen cupboard spray paint is the star of the show, having the right tools can make the entire process smoother and more professional. Think about investing in a spray paint can handle like the **Krylon CAN GUN 1 Aerosol Spray Can Tool**([Amazon Affiliate Link Here]). *Key Features: Ergonomic design, reduces finger fatigue, provides consistent spray.* This simple tool significantly reduces hand fatigue, allowing for a more even and controlled spray. It prevents the cramping that can occur with extended use of spray cans. This not only makes the job more comfortable but also improves the finish by ensuring a steady application.
[Explore Top Rated kitchen cupboard spray paint on Amazon.]
## Pro-Tips / FAQ Section
Here are some common questions and tips to help you avoid common mistakes:
* **”My paint is dripping! What should I do?”** Stop painting immediately and allow the drips to dry completely. Then, lightly sand them smooth and apply another thin coat of paint. Avoid holding the spray can too close to the surface.
* **”I see brush marks/roller texture in my finish. What did I do wrong?”** This usually happens when using a brush or roller with too much paint or when not applying enough pressure. Lightly sand down the brush or roller marks and reapply the primer and paint in thinner, more even coats. Using a high-quality self-leveling paint can also help minimize brush marks.
* **”How do I prevent the paint from chipping?”** Excellent prep work is critical! Make sure you thoroughly clean, sand, and prime the surfaces before painting. Also, allow the paint to cure completely before reassembling the cabinets.
* **”Can I use kitchen cupboard spray paint on laminate cabinets?”** Yes, but extra prep work is required. Laminate surfaces are very smooth and don’t provide much “tooth” for the paint to adhere to. You’ll need to use a bonding primer specifically designed for laminate surfaces. Consider the **INSL-X Stix Waterborne Bonding Primer**([Amazon Affiliate Link Here]). *Key Features: Excellent adhesion to difficult surfaces, water-based, low VOC.* This primer is formulated to bond to glossy surfaces like laminate and provide a solid base for your paint.
* **”How do I dispose of leftover spray paint properly?”** Do not throw away partially used cans of spray paint in the trash. Allow the paint to dry completely by spraying it onto a piece of cardboard in a well-ventilated area until the can is empty. Once the can is empty, you can dispose of it in the trash. Check your local regulations for specific disposal guidelines in your area.
[Explore Top Rated kitchen cupboard spray paint on Amazon.]
## Conclusion: A Kitchen Transformation Within Reach
Transforming your kitchen cupboards with spray paint is an achievable and rewarding DIY project. With careful preparation, the right kitchen cupboard spray paint and tools, and a bit of patience, you can achieve a flawless, professional-looking finish that will breathe new life into your kitchen. You’ve got this! So grab your tools, choose your color, and get ready to create a kitchen you’ll love. This ultimate guide has provided you with the knowledge and confidence to make your kitchen dreams a reality!
[Shop Budget-Friendly kitchen cupboard spray paint on Amazon.]